Summary
When performing the 'right click' on a booked appointment, there are various options available to the user that will be detailed here.

Details
Editing an Appointment
- Right-click on the appointment.
- Select 'Edit Appointment'. Make any required changes i.e. add notes.
- Select 'Save'.
Moving an Appointment
An appointment can be moved from one time slot/surgeon to another by ‘cutting' or 'Copying’ the appointment.
- Select the appointment.
- Right-click and select 'Cut'.
- Right-click on an empty time slot and select 'Paste'.
- The appointment will be removed from it's original slot and placed into the new slot. To keep the original, select 'Copy' instead of 'Cut'.
- If moving the appointment to another slot on the same day, users can drag and drop the appointment from one slot to another.
Managing a Time Slot
Right-clicking on a Surgeon's empty time slot provides two options:
New Appointment - Used to book an appointment, for more information see: Book an Appointment.
Unavailable - Used to block out an appointment slot/s. Can do single or bulk with Shift+Ctrl, right click and select Unavailable of the time slot.
Right-Clicking a Special Surgeon empty time slot provides two options:
New Appointment - Used to book an appointment, for more information see: Making an Appointments.
New Note - Any special surgeon (Repeat prescription, Hospital, etc) can have a note assigned like an appointment.
Adding a note
- Right-click on a free slot.
- Select 'New Note'.
- Enter the Note and select 'Save'.
- The note will appear in the diary column (just like an appointment).

Managing an Appointment
When right-clicking on an appointment, the following options are available:
Set Arrived - Sets the appointment status as 'Arrived'.
Set Failed to Show - Sets the appointment status to 'Failed to Show'.
Set Cancelled - Sets the appointment status to 'Cancelled'.
Set as Treated - The appointment will change to BLUE to indicate the client has been treated.
Set not in treatment - The appointment will change to Purple indicating someone is in the patients history, this will set the appointment back to Red. Can be controlled in Settings - Treatment.
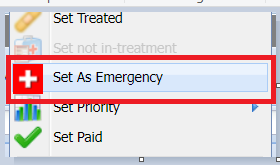
Set as Emergency - Sets the appointment status as an Emergency appointment. The appointment is bordered in red in both the diary and daylists. Once set, the appointment can be right clicked and 'Undo set as emergency' will display.
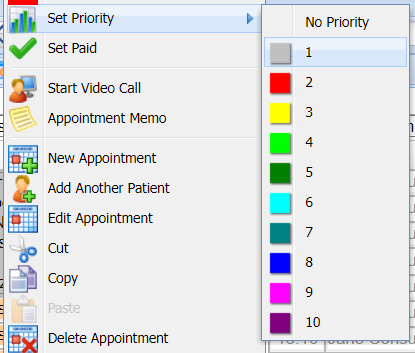
Set Priority - Allows you to set a priority against an appointment. For more information, see 'Appointment Priorities' in the section below.
Set as Paid - The appointment will change to GREEN to indicate the client has paid.
Appointment Memo - Can add a memo to the appointment, shows in the memo column of daylists.
New Appointment - Opens New Appointment screen, allowing you to book another appointment into the same appointment slot. (This is only available if system setting: Allow Multiple Bookings is enabled).
Add Another Patient - Allows you to add another patient (for the same Client) to an existing appointment.
Edit Appointment - Opens the Edit Appointment screen, allows you to edit the appointment details (Reason, duration, surgeon etc.)
Cut - Cuts the Appointment, allowing you to paste it into another appointment slot. Using 'Cut' will remove the existing appointment.
Copy - Copies the appointment allowing you to paste it into another appointment slot. Using 'Copy' will keep the original appointment.
Paste - Pastes the appointment into another appointment slot.
Delete Appointment - Deletes the Appointment from the system.
Print Appointment Label - Prints an Appointment Label to the practice's label printer. This details the appointment date, time, reason and surgeon.
View Appointment Trail - Displays an audit trail for the selected appointment.
Send to Kennel - Sends you to the kennels screen to book the patient into a kennel. For more information, see Kennels.
Arrive and Send to Smart Flow - Arrives the Patient and sends the Patient to your Smart Flow device.
Send to VetCheck - Sends the Patient to your Smart Flow device. For more information, see VetCheck.
Add to Clipper - Adds the selected patient to Clipper. For more information see: Clipper.
Add Weight - Adds the patients weight to the record.
Payments - Will take the user to the Account screen or the quick payments screen depending on if 'Payment action navigates to Accounts' is ticked or not in Settings.
Show Referral - Shows the patient's registered referral details.
Consent - User can generate consent forms.
View History - Shows a pop up Treatment History screen.
View PACS - Navigates to your practice's PACS system. For more information, see PACS.
Appointment Priorities
The Appointment Priorities functionality allows you to flag an appointment using a colour as a visual reference. The block of colour will be displayed in the time box of the appointment.

It will also display within the Appointment Daylists as a square block of colour.

Setting an Appointment Priority
Right-click an appointment.
Select a Priority from the 'Set Priority' List (select a colour from the list).
- The appointment will then be flagged in the Diary 7 Daylists.

Set as Emergency
Sets the appointment status as an Emergency appointment. The appointment is bordered in red in both the diary and daylists.
Setting the appointment as an Emergency
- Right Click on an appointment
- Select Set As Emergency
- This will put a red box with a first aid sign around the appointment
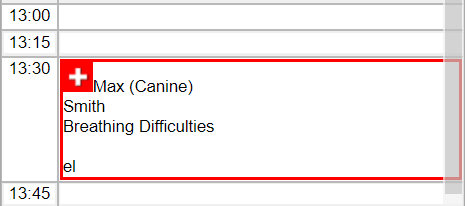
- To remove this Right Click again and select Undo As Emergency


