The 'List All' screen is the default view when entering a Client's Account screen. This screen displays all the purchase, payment, refund, credit, discount and surcharge history for a client. It can also be used to print statements, invoices and delivery notes.

Details
To access the Accounts screen, select a Client and select the Accounts button.
This button can be located when selecting a Client in Reception, in the treatment screen or via any of the Daylists.
View Accounts Activity
Once in the Accounts screen, the Client's Account activity is displayed.
Account Views
There are three views available. The default view is 'Show Items'. If selected, the selected view button will be displayed in blue. 
View | Description/Function |
|---|---|
Show Items | Shows all items and services sold to the client as well as any payments, surcharges, discounts, etc. |
Show Comments | Shows the same information as 'Show Items' but in addition, any Clinical Notes are displayed. |
Invoice Totals Only | Instead of showing a fully itemised view of the account, this view groups the fees charged by invoice and gives only a total for each invoice alongside the invoice number (as well as any payments, surcharges, discounts, etc.) |
Account Filters
The Accounts Screen can also be filtered via the following:
Filter | Description / Function |
Site |
Filters transactions by work site.
|
Show Patient Activities |
Filters transactions by Patient.
|
Invoice No. |
Filters by the Invoice number specified.
|
Docket |
Filters by the Docket number specified.
|
Print/Email Options
Statements, Invoices, Delivery Notes and Receipts can be emailed and/or printed via the the Accounts screen.
Generating an Account Statement
- Select the 'Statements' button.
- Select a printing or emailing option.
The following types of statements can be printed or emailed:
Statement Type | Description / Function |
Statement Total |
A full account statement containing any Merlin transactions for the selected Client.
|
Statement Range |
Contains any Merlin transactions, between the dates specified for the selected Client.
|
Statement Weekly |
Contains any transactions recorded in the last 7 days.
|
Statement Today |
Contains any transactions recorded on the current day.
|
Selected Transactions Only |
A statement containing selected transactions only (selected In the 'List All' screen).Transactions can be selected in the 'List All' Accounts screen by selecting transactions with your mouse and using the shift/ctrl keyboard keys.
|
Group Statement Only |
Produces a Statement grouped by animals for the dates specified.
|
Group Statement With Invoices |
Produces a Statement with Invoices, grouped by animals for the dates specified.
|
Summary Statement Only |
Produces a Summary Statement for the dates specified.
|
Summary With Invoices |
Produces a Summary Statement with Invoices for the dates specified.
|
Generating an Invoice
- Point the mouse cursor at the required invoice number and right-click to display a menu.
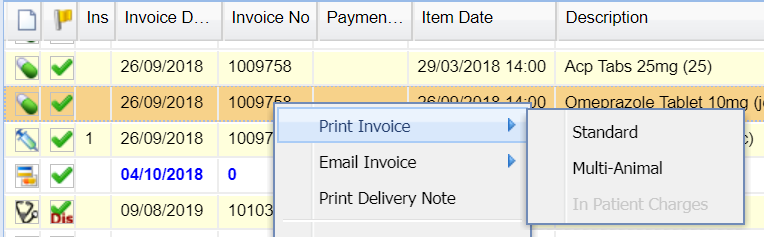
- Select 'Print Invoice' or 'Email Invoice'.
- Select an Invoice Type (Invoice format).

Generating a Delivery Note
- Point the mouse cursor at the required invoice number and right-click to display a menu.
- Select 'Print Delivery Note'.
Generating a Multi-Invoice
- Select 'Print Multi Invoice'.
- A Drop-down list is presented with two options 'Print Multi-Invoice' or 'Email Multi-Invoice'.

Printing Receipts
The system can be configured to automatically print after payment (See: Account Settings). In addition, receipts can be printed manually.
Printing Receipts - Date Range
- Select the 'Print Receipts' button on the Accounts screen toolbar.
- Specify a date range and number of receipts you wish to print.

Once you have set these values, select 'OK' and receipts will be printed.
Printing Receipts - Manually for Specific transaction
- Right-click on a payment and select 'Print Receipt'.
- A receipt will print for the transaction displaying the payment and the items which the payment was allocated against.
Additional Features
Opening Balance
Opening Balances are used most commonly when moving to Merlin from a previous (Non-MWI) practice management system.
The Opening Balance feature allows you to insert an existing balance directly into Merlin.
Adding an 'Opening Balance'
- Go to the Client's Account Screen.
- Select the 'Opening Balance' button.
- Specify a date, Net, Gross and VAT value for the Opening Balance.
- Select 'OK' and a single transaction entry will be added to the Client's Account and the Client's balance will be increased by the amount.
Bounce Cheque
Occasionally, a client will pay by cheque which will subsequently bounce. this feature allows you to register a cheque as bounced and return the value of the account to the client's balance.
- Locate and select the cheque transaction on the Client's Accounts screen.
- Select the 'Bounce Cheque' button.
- Specify a date and confirm the transaction.
- A transaction is entered to detail the cheque has been bounced and the amount is returned to the client's account.
Write Off
The 'Write Off' feature allows you to write off a Client's account. You cannot write off individual items or invoices, but you can enter the full or partial balance that needs to be written off.
- Within the Client's Account screen, select the 'Write Off' button.
- Enter a date, description, gross (by default this is the value of the Client's full balance, net and VAT for the write off and select 'Ok'.
- A transaction is inserted detailing the write-off.
Delete
The Delete button allows a user (with the required security privileges) to delete items from a Client's account.
- Select the item you wish to remove
- Select the 'Delete' button.
Apply Reversal
This feature is used to reverse any Surcharges or Write Off transactions on a Client's account.
- Select a Surcharge or Write Off transaction.
- Select the 'Apply Reversal' button.
- Confirm the reversal.
- A transaction will be added to the Client's Account showing the reversal of the Surcharge or Write Off.
