Summary
Codes items can be added through the 'Code Maintenance' screen for both stock and non-stock items.
Merlin has pre-set defaults for what treatment types are stock vs non-stock. This can be viewed and managed within the Treatment Types Library.
Details
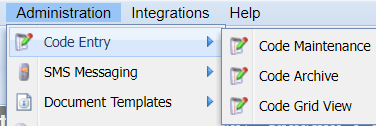
The Code Maintenance screen can be accessed from the 'Administration' menu (Administration > Code Entry > Code Maintenance):
Adding a Code
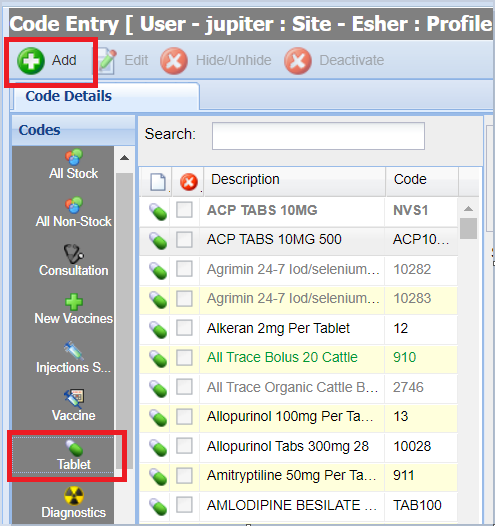
- Select the Code Type (from the left-hand panel) you wish to add the new code item into.
- Select the 'Add' button (at the top left of the screen).
- A new tab will open providing a workflow to add the information for the new code.
- Complete each category and select 'Save'.


Code Category Configurations:
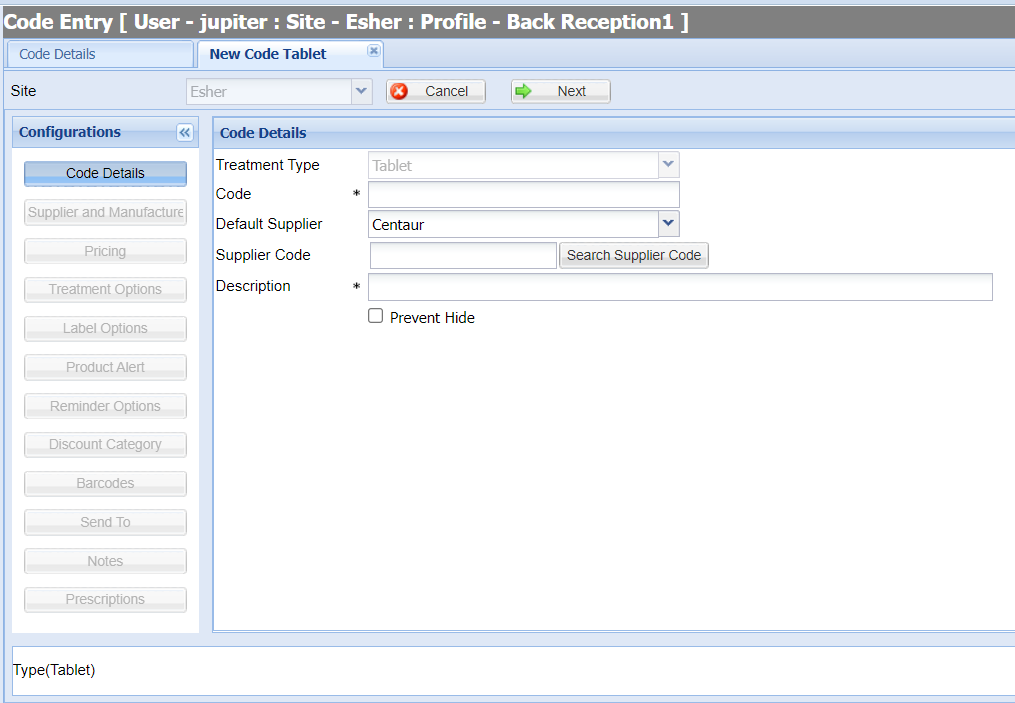
Code Details
Treatment Type
Pre-populated with the Treatment Type (Code Type) the item is being added into.
Code
The asterisk indicates this is a mandatory field. This code must be unique and is used to identify one product from another.

An example of a code would be Con1 for 'First Consultation', Con2 for 'Second Consultation' and so on. These codes can be used as a shortcut when adding treatment.
Default Supplier
The supplier is pre-populated with the practice's default supplier. 'Supplier' is the wholesale company from which the item is usually sourced. One supplier can be specified for each stock item.
Supplier Code
Used to store the code item's supplier code number. If the supplier's price file has been imported into Merlin, you can use the 'Search Supplier Codes' button to populate fields for the required code item.
Search Supplier Codes
- Select the 'Search Supplier Code' button.

- Use the description or supplier code search box to locate and select the required Code.
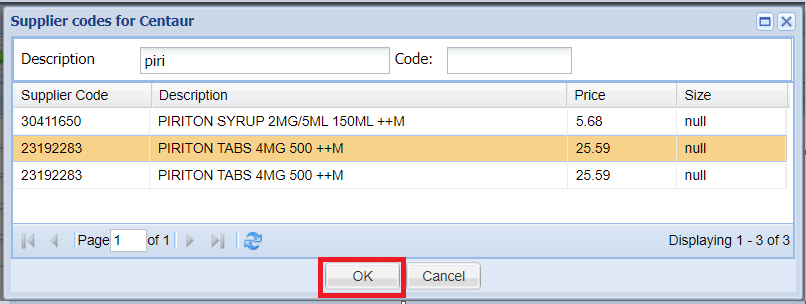
- Press OK


Description
This description is displayed in all areas where the treatment is used, when using the system; it will be printed on any client correspondence (receipts, statements, invoices, etc.). You can remove or add to the description if required.
Prevent Hide
Ticking this option will prevent branch sites from being able to hide the code item.
Supplier and Manufacturer
The next section is Supplier and Manufacturer screen and will only display when adding stock items and will not display when adding non-stock items.
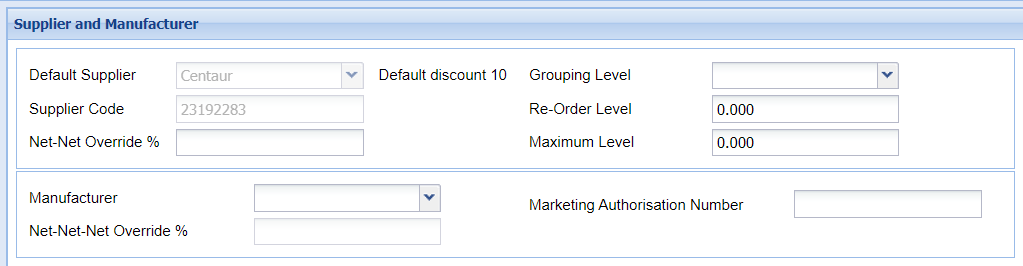
The following fields can be populated:
Default Supplier
This is auto-populated for reference as it was set in the Code Details section.
Supplier Code
As above, this is auto-populated as previously set for reference.
Net-Net
Net-Net is the cost price after supplier discount.
Net-Net Override %
Net-Net Override allows you to set your code specific discount percentage, this is the discount % from your supplier.
Net-Net-Net
Net-Net-Net is the cost price after supplier and manufacturers discount.
Net-Net-Net Override %
Net-Net-Net Override allows you to set the discount percentage from the manufacturer so the Net-Net-Net is calculated correctly.
Grouping Level
Allows you to select an ordering grouping level from Level 1 to Level 10. These levels can be used to categorise stock when ordering.
Re-Order Level
If utilising the automatic ordering process within Merlin, this figure is used to dictate at what level the product will be reordered. i.e. if set at 250, if stock falls below 250, the item will be added to the next order placed.
Maximum Level
Setting a Max Qty & Re-Order figure enables automatic ordering. When an order is triggered the quantity ordered will be sufficient to take the stock level from its Re-Order figure to its Max Qty figure.
Manufacturer
Set the manufacturer of the item for example, Hills Canine Id 5k manufacturer would be set as Hills
Pricing
This section provides a grid to calculate the pricing for the item. Certain items require user input/modification (available boxes). Other items are populated from previous information provided (greyed out boxes).
Note for multi-site practices - When a user is logged into a branch site, you will notice a tick box named Track Main Site Price. If this is ticked, it ensures that the prices from the main site will be tracked at branch level:

Turning this off will allow the branch site to set their own pricing.
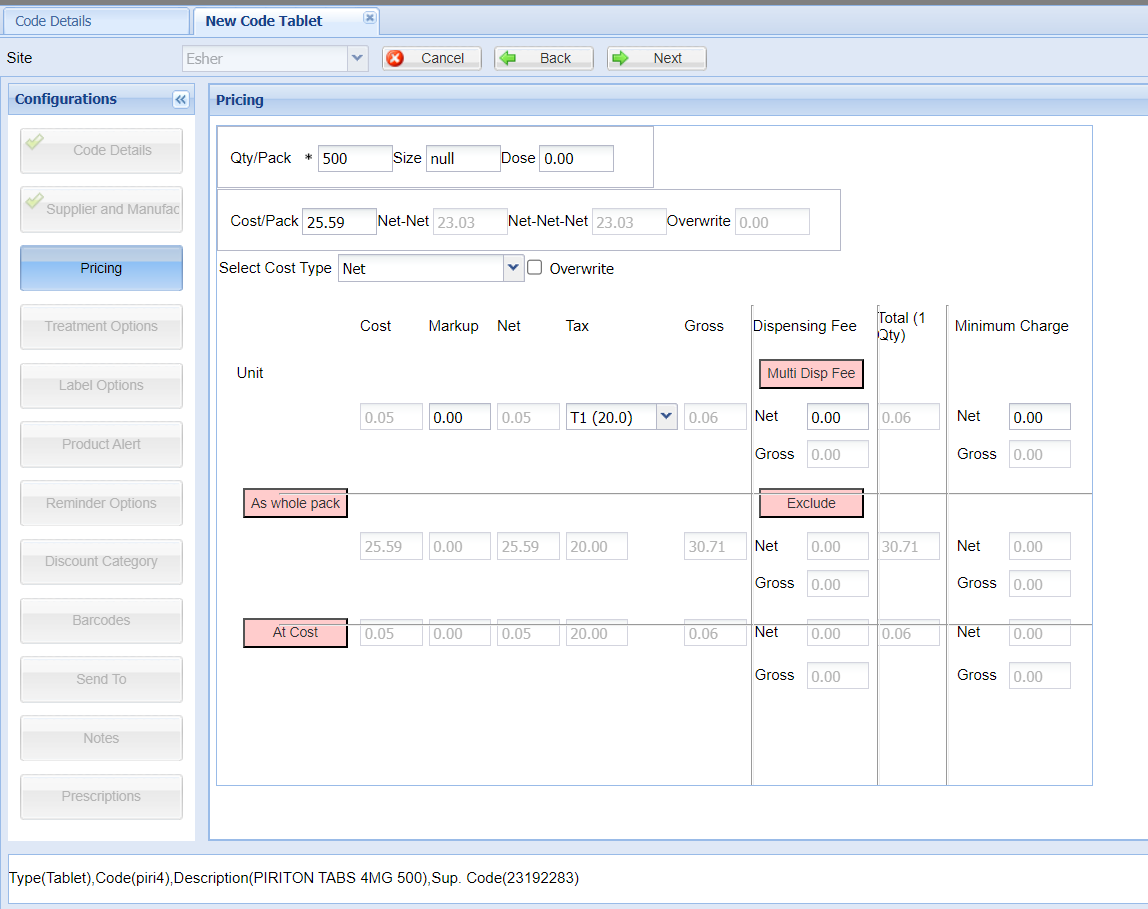
Qty/Pack
This field is used to calculate the cost per item for a product.
Size
The Size field is used for reference only and contains information about the delivery quantities of a product e.g. 100ml, 1000 tablets.
Dose
Dose is used for reference only.
Cost/Pack
Cost per pack is the cost at which the product is supplied to the practice by the wholesale supplier.
Overwrite
It is possible to set a product with a 'Overwrite Price'. Overwrite Price is not inclusive of the dispensing fee. The dispensing fee will be added in addition to the Overwrite Price on the treatment screen.
Note: If you set an item with a overwrite price, the price is not updated when you run a price update. You must remember to update all overwrite priced products manually.
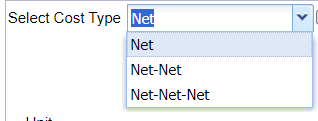
Select Cost Type
A Cost Type can be selected from the drop-down list provided.
Unit Cost
This price is calculated by the system and is the cost price per unit. It is the Cost per pack divided by the quantity per pack. It can be thought of as the cost per unit.
Unit Mark-up
The mark-up % is set by the practice and is applied to the cost price. A mark-up of 50% on an item with a cost price of £0.42 will have a calculated net price of £0.63.
Unit Net
The Unit Net Price is calculated as Cost price + Mark-up.
Unit Tax
The Tax rate charged upon this item. Default Tax rate is 20% for mainland UK (correct as of 23rd May 2022).
Unit Gross
Unit Gross = Unit Net + Unit VAT
Unit Dispensing Fee Net
The Dispensing Fee is a flat fee added to the sale price of a product and is not affected by the quantity of the product sold. The dispensing fee amount is Net (i.e. pre-VAT).
Unit Dispensing Fee Gross
Dispensing Fee Net + Tax = Dispensing Fee Gross.
Multi- Disp Fee
Enabling this setting allows you to apply a different dispensing fee depending on how a product is administered, to whom it is sold or according to the quantity sold.
Any product can be set to allow Multiple Dispensing Fees by selecting the 'Multi-Disp' button for a code item. If enabled, when dispensing an item, the user is prompted to select a dispensing fee. Adding multiple dispensing fees is set-up via Libraries > Accounting > Dispensing Fees.
Total (1 Qty)
Unit Gross + Dispensing fee Gross = Unit Total (1 Qty)
Minimum Charge
The Minimum Charge is a Net value for example:
A product is sold for 10p per unit + Tax and a minimum charge of £2 is set.
If 5 units are sold the price is £2+Tax
If 10 units are sold the price is £2+Tax
If 25 units are sold the price is £2.50+Tax because the minimum charge has now been exceeded.
As whole pack
The sell as whole pack option is applicable to stock items only and allows the practice to sell the whole pack of treatment items to the client.
This option can be enabled by selecting the 'As whole pack' button. When dispensing a code with this option enabled, the user is prompted to either sell the item as a whole pack or individually.
Exclude
The 'Exclude' button excludes the dispensing fee when dispensing as a whole pack.
At cost
Items dispensed with the 'At cost' button enabled will be dispensed at cost price for any applicable clients. For information on setting 'Sell at cost' for Clients see Reception > Additional Information.
Treatment Options
This section controls how the Code behaves when dispensing through the add treatment screen.
See Adding a Treatment - Treatment options for further information.
The functionality of enabled treatment options are summarised below:
'Qty Req' - Quantity Required
Prompts the user to enter a quantity when the code is sold. This is usually enabled for stock items rather than non-stock items.
'Batch Req' - Batch Required
Prompts the user to enter or select a batch number/expiry date when dispensing an item.
'Is Microchip' - Is a Microchip Treatment.
Prompts the user to enter a chip number when the item is dispensed.
'Alter Sex' - Alter Patient Gender
Changes the patient's gender when dispensing an item. i.e. gender changes from 'male' to 'male neutered'.
'Wormer' - Worming Treatment
Defines the item as a worming product and subsequently updates the patient's "Last Wormed" date in the summary side panel when the item is dispensed.
'Flea' - Flea Treatment
Defines a product as a flea treatment and subsequently updates the patient's "Last Flea" date in the summary side panel when the item is dispensed.
'Link Qty to Mileage' - Links quantity to mileage
The quantity of the item dispensed is set to the mileage value entered in the clients 'Additional Information'
'Enable Documents'
Allows you to attach a document to a code entry item such as a data sheet. When dispensing, the user is given the option to generate the associated document.
To attach a document, first click 'enable documents'. Users are then able to use the drop down to select the relevant document by clicking 'Assign Document'.

The template itself must have already been created and uploaded into the document templates library within the code entry category.
Note: Only one document can be assigned per code.
Filter: Treatment Category
Allocates the item to a user-defined treatment category for reporting purposes.
Filter: Client Category
Allocates item to a default "Client Category", this does not prohibit sale to a client of a different category, it changes the appearance of the product in the code entry to be the same colour as the selected client category.
Filter: Legal Category
Applicable to Stock Items Only. Allocates a Legal Category to a treatment e.g. POM-V, AVM-GSL, etc.
Filter: Code Group
Applicable to Stock Items Only. Used for sub-categorising your stock codes for reporting purposes.
Filter: Species
Prohibits the sale of an item by Species. If filtered, the item will only display when dispensing treatment if the patient's species matches the item's species specified.
Filter: Health Care Group
Used to assign a code to a Health Care Treatment Group. For more information see Health Care Plans
EQM (Equivalent Quantity Multiplier)
This feature is used to resolve the potential issue of over prescribing drugs that are on the Health Care Plan in the same category.
If an EQM is specified, when dispensing a HCP item, the quantity dispensed will be multiplied by the number entered into the EQM field.
For example, a 6 pack of Advocate would mean the EQM is set to 6.
Label Options
The next section allows you to set the labelling options for the item.
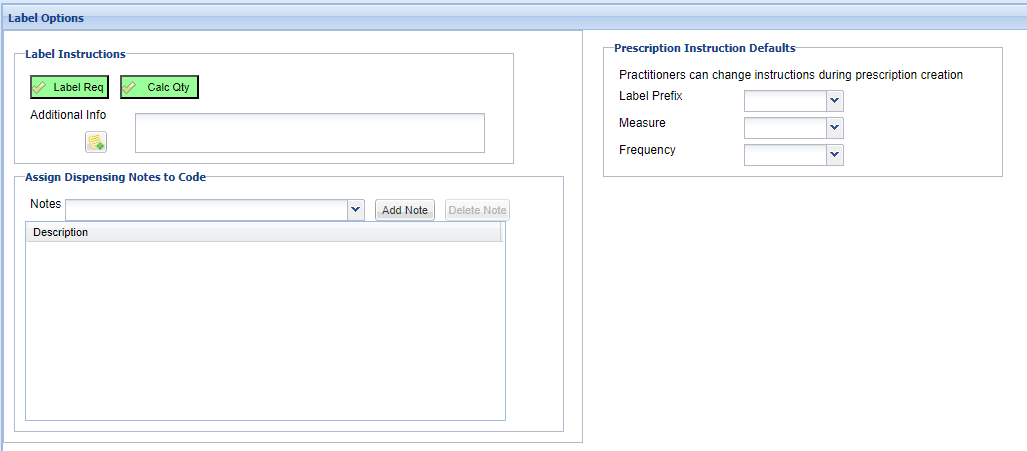
Label Instructions
'Label Req' - Label Required
If enabled, the user is prompted to generate a treatment label when dispensing an item.
'Calc Qty' - Calculate Quantity
If enabled, calculates the quantity sold from any numerical data entered on a label i.e. "Give 1 tablet 3 times daily for 5 days", Merlin will multiply the figures together to set the qty as 15 tablets.
'Additional Info' - Additional Information
Any text entered here will pre-populate onto a treatment label.
Additional Info Icon - Allows a user to click this to pre-populate text of ‘For External Use Only’, if relevant to the code being added.

Prescription Instruction Defaults
If information is specified, it means it will auto-populate the information entered on prescription label screen when adding a repeat prescription as treatment.
Assign Dispensing Notes to Codes
Used to specify which dispensing notes can be used for an item. These can also be entered via free-text.
Available dispensing notes can be added and maintained under Administration > Treatments > Dispensing Notes.
Default dispensing notes can be added per treatment type i.e 'Topical Medication' via Administration > Treatment > Treatment Types. When these are in place, they will apply to each code created in a that treatment type automatically and cannot be deleted.
Once the Label Options section has been completed, select the 'Next' button to proceed to the next configuration category.
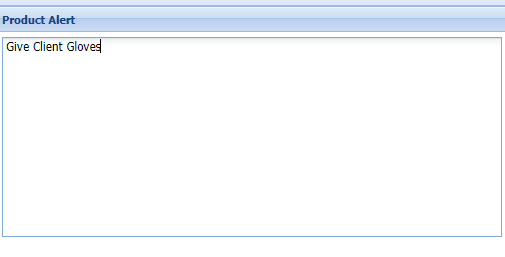
Product Alert
Product Alerts are used to notify/remind the user when dispensing the item through the Add Treatment screen. When adding the item, a message will display with the Product Alert. Note - this alert will not display on the treatment label.
To add a Product Alert, type the required text into the box provided and click 'save'.
Reminder Options
This section is used to configure patient reminders and compliance reminders.
'Reminder Req' - Patient Reminders
Enables a patient reminder for the item. Once the button has been enabled, assign a Reminder Type to the product, select a duration for when the reminder will be sent after the item is dispensed. You can then specify the next code item that will be required, if it differs from the one being added.

Each patient can only have one active reminder of each reminder type stored against its file.
The following is the recommended method of reminder configuration.
‘Reminder Req’ - Compliance Reminders
Enables the creation of a Compliance reminder once the item has been dispensed. Once the 'Compliance Reminder' button has been enabled, set how often you wish the reminder to be sent after the item is dispensed, how many times this reminder should be sent and the description text for the product.

Discount Category
This section is used to configure the value of discount per Discount Category. With 'Apply Discount Category' enabled and discount categories set, any client or patient who has a discount type (see Reception > Additional Information) will receive the discount specified for this treatment).

To add a discount, select the discount type from the drop-down list, input the discount percentage and select 'add'.
Discount Categories are created via Libraries > Accounting > Discount Categories
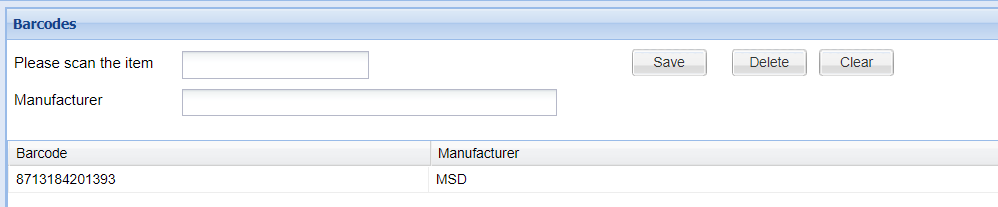
Barcodes
This section is used to store a barcode against an item. Once a barcode has been stored, a user can dispense the item in the treatment screen by scanning the barcode rather than searching and adding the item in the Add Treatment screen.
Send To
Codes in Code Entry can be configured to prompt the user to send patients to a Daylist when the item is dispensed through the treatment screen.

Notes
The final section does not affect the dispensing of the item. It allows you to store a note regarding the code item.

To add a note, use the text box provided and select ‘Save’ to add the note. Notes can also be deleted and printed from this screen.
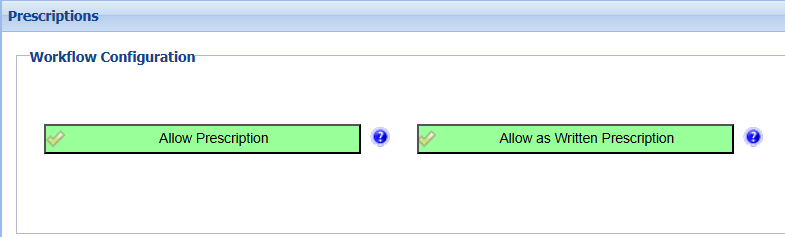
Prescriptions
Allow Prescription
This enables repeat prescriptions for the treatment. If this is turned off, users will not be able to create repeat prescriptions for this product as the product will not display when adding a treatment via the ‘prescriptions’ radio button.
Allow as written prescription is on be default for all stock codes and enabled the user to create a written prescription for the product.
Saving the Code
Once you have completed the final Notes section, there will no longer be an option to proceed to the next category, instead a 'Save' button will be available. Once selected, (if you have multiple sites) the below window will appear:
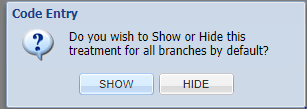
Select 'SHOW' to show the code at all branch sites or select 'HIDE' to hide the code from branch sites. If you are a single site, this prompt will not appear.
A confirmation message will appear that the code has saved correctly.
